Milbros Onboard Installation Instructions
Introduction
Milbros Onboard is the offline version of Milbros Online, intended to be used by the ship’s crew with little or poor internet connection.
Installation is done via the USB stick provided, or from the installation package downloaded via a link provided by Milbros. You will also need the Quick Installation Guide with the license key needed to install the program.
Very Important: Prior to starting a local installation, you must log in to the target computer(s) as a user with administration rights for the computer. For a network installation, you must have administration rights for both the local computer and the network. You will also need to determine a network location that all planned client computers can read/write to needs to.
Software/Hardware requirements
1 gigahertz (GHz) or faster x86-bit or x64-bit processor
Windows Vista/7/8/10 or Server 2003/2008/2012
Net Framework 2.0 SP2 or higher
1 GB RAM (32-bit); 2 GB RAM (64-bit)
2GB Hard Disk Space
1280x1024 Screen Resolution (Recommended)
Internet connection for online activation or access to email with attached file capability for activation and synchronization.
Step 1 – Beginning installation
Insert the USB stick provided and wait for any needed drivers to install, or install from the downloaded ZIP-file. Then, open the folder from My Computer or from the AutoPlay pop-up to view files on the USB stick. You should see files similar to the screenshot below. Package downloaded from should also include these files.
Select Setup.msi to start installation. The Milbros Setup Wizard should appear.
Note: The “USERDOCS.zip” folder may not be present depending on your subscription.

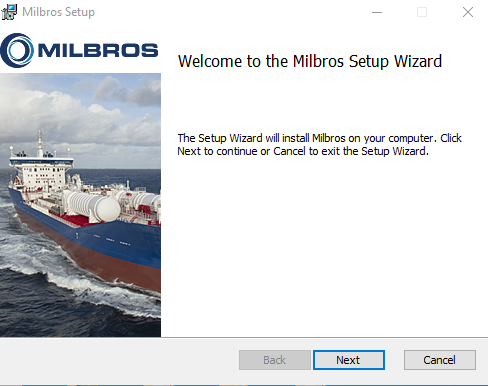
Step 2 – Installing Milbros Onboard with the Milbros Setup Wizard
Select the Next button to continue with the Milbros Setup Wizard.
Then, accept the default destination folder or create your own on this screen. We recommend accepting the default.
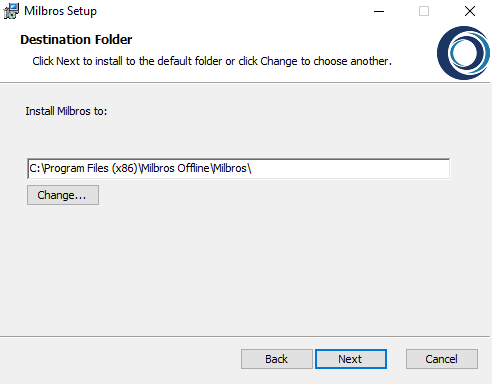
Select the Next button to continue to the next step. Then, select Install.
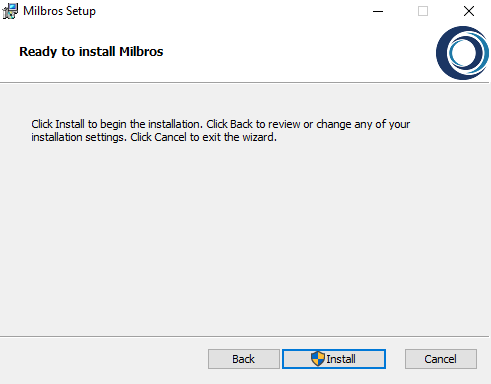
Windows may provide a pop-up asking if it is OK to update your computer or hard drive.
Select Yes.
Step 3 – Validating your registration
Next, validate your registration by entering the Milbros License Key provided in the Quick Installation Instruction sheet or from Milbros or your IT department. Then, select Verify Key.
Example license key: 1234-5678-9876-ABC4
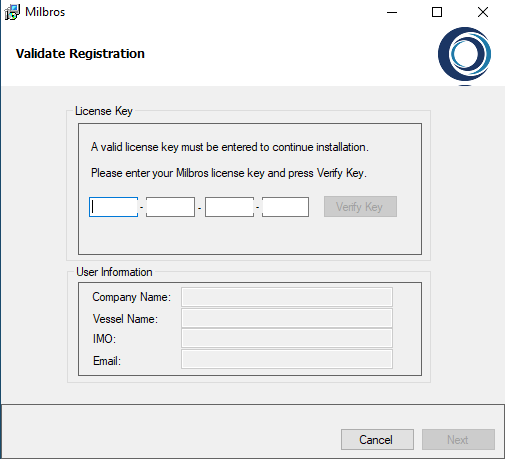
Note: The license key is case-sensitive.
Complete user Information:
Company Name: Name of company with the Milbros Subscription
Vessel Name: Vessel Name and suggest adding computer(s) location
(For example: MT Milbros Topaz Master or MT Milbros Topaz CCR)IMO: Vessel’s IMO number if not installed on a vessel enter NA
Email: Vessel’s or users e-mail address. Multiple e-mail addresses can be entered here, separated by a semi-colon “;” (Important: e-mail synchronizations will only be returned to the e-mail addresses entered here, so please enter them carefully.)
Note: The Next button will not highlight until all fields are completed.
Once all fields have been completed, select Next. If you are only installing a stand-alone local installation, you can skip the next step in this guide.
Step 4 (optional)– Installing a network version
If you are installing a network version of the program and if a Network License Key was provided, the below screen will appear.
Note: For the first client installation you need to select the Network location where all the data files will be saved. All other Client Computers will need to be able to Read/Write to this network location/folder.
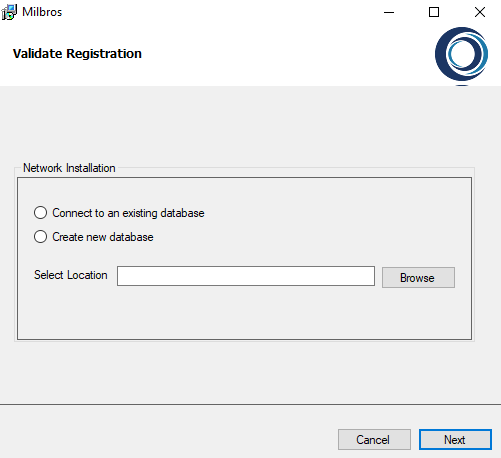
Select the Create new database button and type in or browse for the desired location for the data files. Using the Browse button on this screen may or may not be able to locate your planned or selected location for the network database. You may need to type or copy the path to the folder manually.
To find the path in order to copy it you can use:
Windows 7/8/10 Computers: Click Start – Computer, Locate the folder location and then copy the path from the address bar.
Windows XP Computers: Click on My Computer Locate the folder location and then copy the path from the address bar.
Then select Next.
Step 5 - Installing on multiple computers
Once it installs, the program needs to be started and activated from the first client computer before proceeding to install on additional client computers.
For each subsequent client installation, run the installation package and when reaching this page, select the Connect to an existing database button and select or browse for the location where the data files have been saved. Then, select Next.
Once the program installs, the program needs to be started and activated on each client computer before proceeding to install on additional client computers.
You need to install on the client then activate the client, install on the next client, then activate. Continue with this process until all clients are installed and activated.
Note: During the installation process the user login must have administration rights to both the local client computer and to read/write to files in the planned network location. To run the network version of the program, the user will need to have rights to read/write to files in the planned network location.
Installation of program and all files may take 2-10 minutes or longer depending on the speed of the computer. Once completed the completion screen should appear
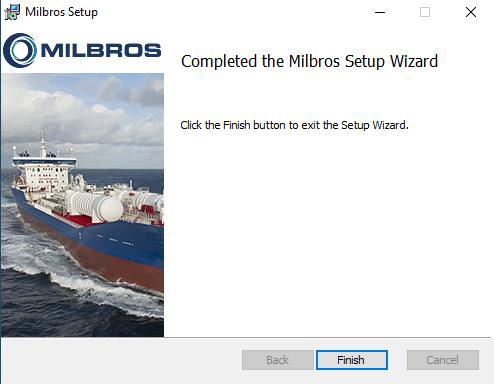
Select Finish and the Milbros icon should have been saved on your desktop.

Step 6 – Activating Milbros Onboard via the internet
Select the Milbros Icon, or go to Start > All Programs > Milbros Offline > Milbros icon to open Milbros Onboard. The following screen will appear:
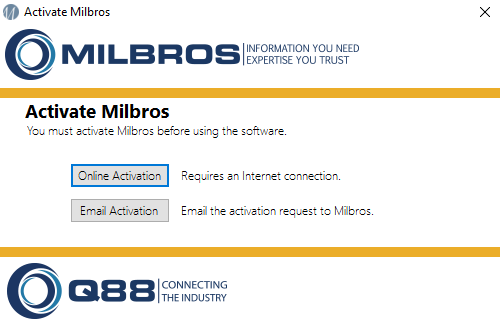
If computer is connected to the internet then the Online Activation button will be active. Select this button and after a brief delay the program should start loading. Loading all data to the client can take 30-60 seconds.
Step 7 – Activating Milbros Onboard via email
If your computer is not connected to the internet, then activation via email will be required. Select the Email Activation button and the following screen will appear
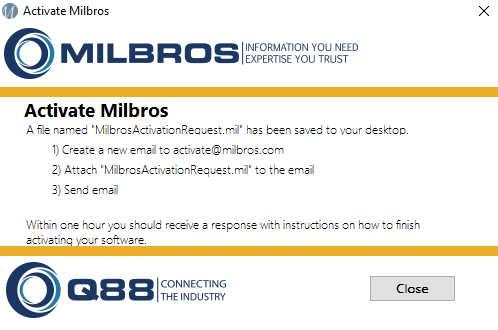
Create an e-mail addressed to: activate@milbros.com
And attach the “MilbrosActivationRequest.mil” file that had been saved on the desktop to the email.
Within one hour (usually 5-10 minutes) you will receive an email with the activation file and instructions. Follow those instructions to activate the program and the program should start.
Synchronizing Data
The program must be synchronized at least once every 60 days or the program will stop working. The user will get reminders to synchronize after 30 days.
It's recommended that the data is synchronized weekly after the Milbros Commodities Changed Notification email is received. Data can be synchronized as often as daily to get the latest Company Private data or files.
Step 1 – Starting to synchronize
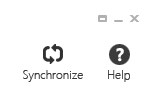
To synchronize, select the Synchronize icon at the upper right hand corner of the program and the following screen will appear.
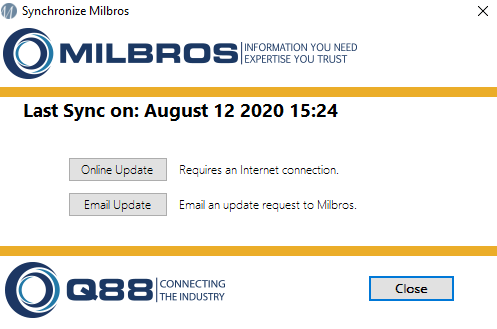
If computer is connected to the Internet then the Online Update button will be active. Select this button and the synchronization should start by fetching data and then merging data. This process can take several minutes.
Step 2 – Restarting Milbros Onboard
When the synchronization is complete you will get a screen to restart Milbros to access all the latest information.
Step 3 (optional) – Synchronizing via email
If the computer is not connected to the internet then synchronization via email will be required. Select the Email Update button and the following screen will appear
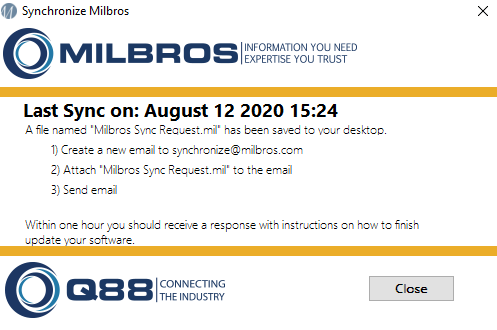
Create an e-mail addressed to: synchronize@milbros.com
And attach the Milbros Sync Request.mil file that had been saved on the desktop to the email.
Within one hour (usually 5-10 minutes) you will receive an email with the synchronization file and instructions. Follow those instructions to synchronize the latest data and the program should be restarted by clicking continue.
Should you have any problems with the installation, please send an e-mail to: support@milbros.com . Including screenshots of any error screens will be helpful.