PL for Principals - Main PL for Principals Page/Open Positions
The main Q88 Pro page has been designed with the users’ primary purpose in mind. It maximizes the use of the keyboard to searching and updating the ships open positions. As you get used to the system, please keep this in mind that the keyboard is the best way to use the system.
The Q88 Pro allows users to designate ships that they operate and have the positions and cargo history updated automatically on the platform.
1. Overview
Users may see a Terms of Service pop-up window the first time they log in to the Q88 Pro module (accept).
Below is the main page which displays when you first login to the Q88 Pro module.
The panel on the left side of the page is used to create a list of vessel positions, either from a Saved Search or by performing a new search (aka non-saved search).
To enable the ‘dark mode’ click on the semi-moon symbol in the upper right-hand corner as noted by the arrow.

2. Notifications
To see any new features, important notices or other messages from Q88, a notification feature can be found on the upper right-hand side of the blue bar.
You will also get a notification each time a saved search analytics are being run.
By clicking on the bell, you are brought to this pop-up.

Once this window is open, click on the message you want to see. Once the message is read, the background color will turn white.
The rewind button at the top left corner of this pop-up will bring you to the history of your notifications.
3. My Fleet
“My Fleet” are ships that you designate as your company fleet to be tracked in the Position List.
With a direct feed from your VMS system, open positions will be auto populating for all vessels that coincide with the VMS platform.
Open Position is defined by the three fields:
Port
Open Date
Last Three Cargoes
Any vessels that are designated as “My Fleet” will always be presented in bold.
Additionally, you can update any of the three fields coming in from their VMS system.
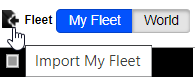
We will preload all ships that are currently in use in your VMS. To assure that all ships are loaded, click on the following icon:
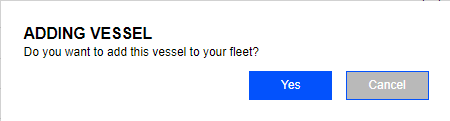
Once you click this, you will see this pop-up:
In addition, you can designate a vessel for my fleet two additional ways:
In the ‘Add Vessel’ text box, when the user is on the My Fleet view
You then type the name of a vessel that is you want to add to My Fleet.
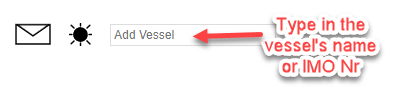
You will get a prompt that asks, ‘Do you want to add this vessel to your fleet?’. By clicking ‘Yes’ the ship is added to ‘My Fleet’.
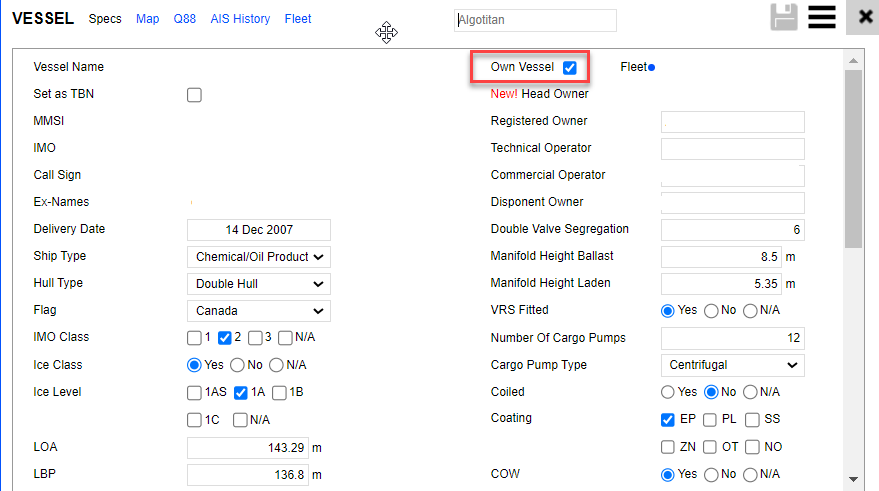
In the Vessel Specs section (select the vessel, hit the shortcut key V for specs), click the box ‘Own Vessel’ and Save from the disk symbol. If this box is unchecked, the vessel gets removed from “My Fleet”. For more on the vessels specifications see PL for Principals - Vessel Specifications / Vessel Details
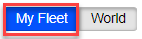
In order to view all of your vessels, click the “My Fleet” option.
By clicking on “World”, you will see all vessels on a given search.
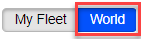
The selected option will be highlighted in blue.
4. Creating a New Search
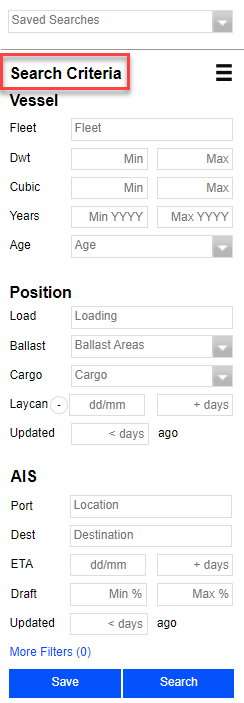
The Search Criteria panel on the left side of the page is used to create a new search and view the vessels results.
Clicking the keyboard shortcut “N” (for New Search) will clear the existing fields and set the focus on the first field “Load”.
Search Criteria: Combine Vessel and Position search criteria or Vessel and AIS search criteria to search for ships based on their open position or their AIS destination / location.
Vessel Search Criteria
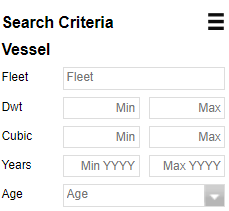
Fleet: Search by ships belonging to a specific commercial operator. Use the multi-select fleet icon to specify multiple Fleets to search on simultaneously.
Dwt: Enter the DWT range of ships you want to filter on. Enter the DWT in 1000’s - for example, 50-80, not 50000-80000, although either will work.
Cubic: Enter the min and max cubic range, it works the same as DWT.
Years: Give a range of years built
Age: The dropdown is used to filter on ships that are not older than a specified value.
Position Criteria - used to search for ships based on their open position
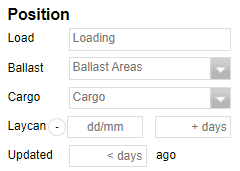
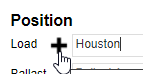
Load: Enter the load port or load area you wish to calculate the ETA to. Any vessel open in this load area will be added to the search results if it meets all the other search criteria. If you want to calculate the ETA to multiple ports simultaneously, use the add port icon ➕ to enter up to 4 additional ports.
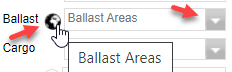
Ballast: Select from a list of user-defined ballast areas (click the down arrow). These are the other geographical areas which the system will ballast ships from and calculate the ETA to the load port/area.
Use the globe icon shown in the following image to create a new ballast area selection.
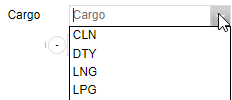
Cargo: Select CLN, DTY, LNG, or LPG. If you leave this field blank, the search will return all vessels, whether they are CLN (clean) or DTY (dirty).
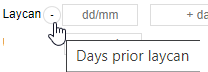
Laycan: The lay/can window can be entered in three different ways.

a) Entering a date “mm/dd or dd/mm” (based on your regional settings) will look for all open vessels or have an ETA (if a load is specified) after the date entered.
b) Entering “+ days” will look for all open vessels or vessels with an ETA before the number of days entered in the “+ days” field. Note : this method is preferred for saved searches.
c) Entering a date “mm/dd” and “+days” will look for ships open or have an ETA on or after the date entered and on or before the number of days after the date entered. For example, if you enter “06/20” and “10”, the search results will return all ships from open or those with an ETA from 06/20 - 06/30 (US date format in this example).
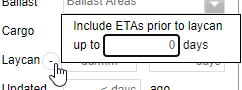
You can also include ETAs prior to laycan up to a certain nr of days, click the Days prior laycan as per below screenshot
Updated: Entering a value for this field will exclude all ships without an updated position in the last “< days” number of days as specified.
AIS Criteria - used to search for ships based on their current AIS position or reported AIS destination
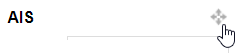
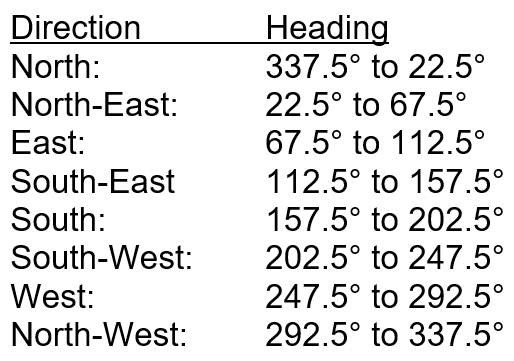
Heading: Use the heading icon located next to the AIS Search Criteria to filter ships heading in a specific direction.
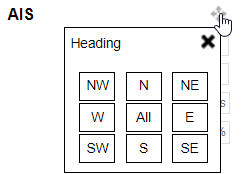
Each direction filters ships as follows:
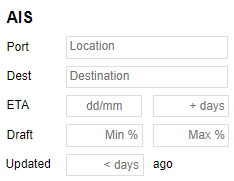
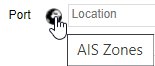
Port: This field lets you search for vessels in a specific port or area. If a port is entered, then all vessels within 20 miles of the port will be listed. If an area is entered (ex. AG), then all vessels in that area will be listed. Use the globe icon to select multiple areas.
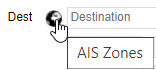
Dest (destination): This field lets you search for ships with a specific destination port or destination area. Use the globe icon to select multiple areas.
ETA: The ETA window works the same way as the laycan window, but the ship's ETA is based on what is reported by the vessel via AIS.
Draft: Enter the draft % range of vessels you want to filter on. This field is useful to filter out ships that are currently ballast or laden. More than 60% the system presumes the vessel is in laden condition.
Updated: Entering a value for this field will exclude all ships without an updated AIS position reported in the last “< days” number of days as specified.
Once all the search criteria have been entered, select the Search key on the keyboard to perform the search.

Vessel criteria can be combined with Position OR AIS criteria. Combining both Position and AIS criteria may not return results with valid data. When searching for ships based on their AIS criteria, only the Cargo can be combined from the Position Criteria.
For more guidance on how to search and update vessels, please refer to the following link:
PL for Principals - Search for Vessels and Update
5. Saving a Search
Once a search has been run, the “Save” button to the left of the Search button will become visible.

Clicking the button will prompt you to name the Search you wish to save as per below:
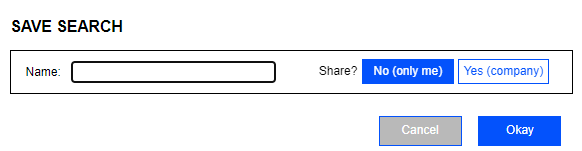
Enter the name you wish to save it under, and it will now display in the Saved Search drop-down in the top-left corner of the page.

Searches can be saved as shared, select “Yes (Company)”, which will make the Saved Search accessible to everyone in the company.
Changes to a saved search will affect all users. This includes manually adding and hiding vessels from the list.
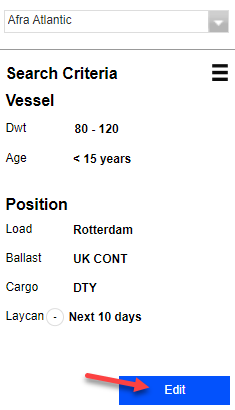
6. Editing a Saved Search Criteria
When viewing a Saved Search, you can click the “Edit” button right below the Search Criteria to make changes.
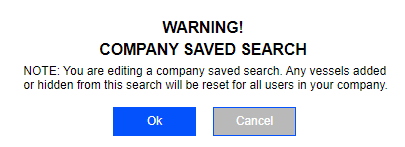
Editing a company saved search will affect all users and any vessels that were manually added or hidden from the search will be reset back. The following warning will remind you
All available filters and the values used will be editable, make changes as needed. When you are done editing, simply click the Search button again and the Saved Search will be updated with the revised search criteria.
7. Editing a Saved Search Settings
When viewing a Saved Search, you can click the actions menu (tri-bar) next to the Search Criteria and select the “Edit Search Settings” option to make changes to the search.
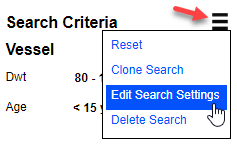
Use this option to rename Saved Searches or change whether is shared or not. Click the “Okay” button when done to save your new settings.
Editing a company saved search will affect all users and any vessels that were manually added or hidden from the search will be reset back.
8. Deleting a Saved Search
When viewing a Saved Search and you wish to delete it. Click the Actions menu (tri-bar) next to the Search Criteria and select “Delete Search” from the menu.
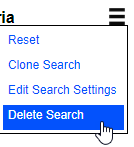
Deleting a company saved search will remove it for all users!
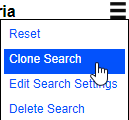
9. Cloning a Saved Search
When viewing a Saved Search and you wish to create a duplicate version of it. Click the Actions menu (tri-bar) next to the Search Criteria and select “Clone Search” from the menu. Give the new search a name and select whether the new search will be shared or not.