In IMOS, follow these step-by-step instructions to create a detailed estimate.
Be sure to save regularly while creating the estimate, as the system does not automatically save during each step.
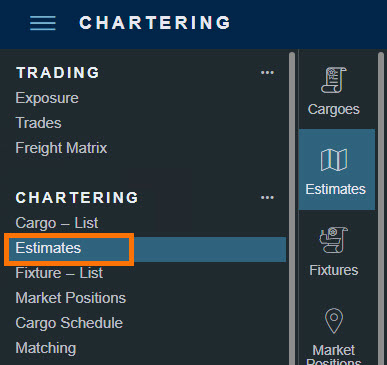
Step 1: Go to the Estimates Workspace
To create a new Estimate:
In the left menu panel, select Estimates under the CHARTERING heading.
Step 2: Open Estimate View
The Estimate appears in column view by default, as part of a Worksheet.
To go to the Estimate details view, click the ID of an Estimate column.

Click Untitled (when unsaved) or the name of the Worksheet in the details view to switch back to the column view.

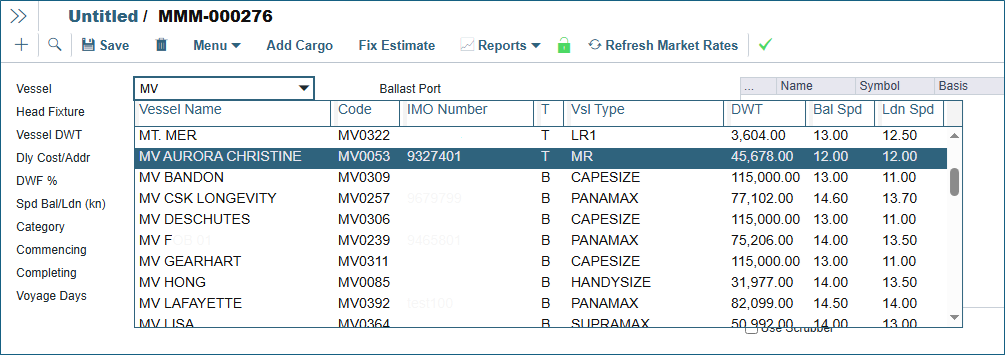
Step 3: Select a Vessel
Start typing the Vessel name or select it from the drop-down menu.
You can also add new vessels in this field by typing in their names. A prompt will confirm that the vessel does not already exist in IMOS and ask if you want to add/import it to IMOS.
Step 4: Update Estimate Top Grid Details
Many of the fields in the top grid are automatically filled in by IMOS based on the vessel selected in the estimate. We recommend modifying this information if necessary. In this grid, you can also modify the routing preferences for the Estimate.
Below are two examples of how the top estimate grid changes with different vessel types.
Example 1: Time Chartered (TC) Vessel with Current Voyages:
-
Details from the time charter/vessel are pulled into the Estimate. This includes hire, bunker prices/types, company details, and vessel figures.
-
Bunker prices are from either the TC contract or the bunker inventory of the last voyage.
-
The Ballast Port is the final discharge/terminating port of the last voyage.
-
The commencing date criteria is based on the completion date of the last voyage.
-
The default Opr Type (Operation Type) of TC vessels is TCOV.

Example 2: Owned Vessels with current voyages:
-
For owned vessels, companies can create Head Fixtures so daily cost and general vessel details will be displayed in the Estimate.
-
Without a head fixture, all the Estimate fields are from the Vessels screen.
-
Bunker prices are from the last voyage.
-
The commencing date is from the previous voyages.
-
Commencing date and ballast port details are pulled from the last voyage.
-
The Opr Type defaults to OVOV for owned vessels.

Step 5: Enter Bunker Prices
If this vessel has previously been used in IMOS, the last bunker ROB price from her last voyage will be automatically taken here.
Select the … icon next to each fuel type to review the Bunker Planning screen. In this screen, you can update initial bunker quantities and set up calculation methods for different fuel types.

Step 6: Create New Cargoes
In the Estimate, enter new cargo information if the cargo has not been created in IMOS. Skip this step if the cargo already exists in IMOS.
-
Select Add New Row in the Cargo section of the estimate.
-
Select a Cargo or Cargo Group name.
-
Enter the Charter Party Quantity (C/P Qty) and select the Unit.
-
Select a Freight Type (T) and freight rate (Frt Rate or Lumpsum).
-
Enter Commission Percentage (Comm%).
-
Select the Charterer for the cargo.

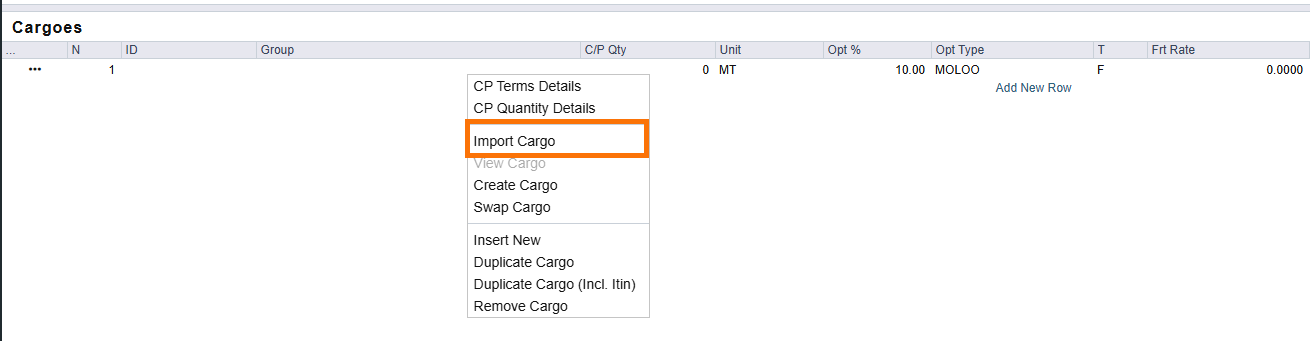
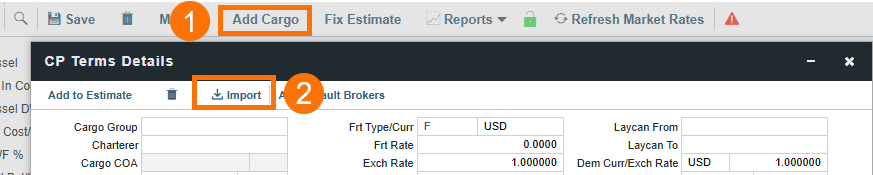
Step 7: Add Any Existing Cargoes
-
Method 1: To add an already existing cargo, in the Cargoes grid, click Add New Row. Right-click the added row and select Import Cargo.

-
Method 2: In the Estimate menu, select Add Cargo. In the CP Term Details window that opens, select Import.
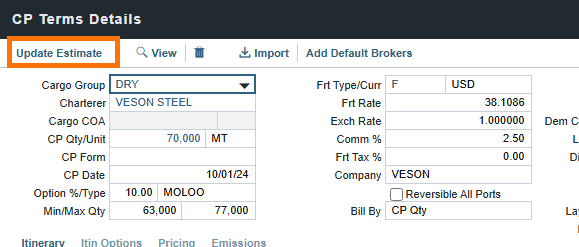
Step 8: Update CP Terms Details
Right-click each Cargo line and then click CP Terms Details to insert additional CP details, including load and discharge port and commissions.
For more information about completing this section, including entering Demurrage/Despatch values, see IMOS - CP Terms Details.

Note: If you imported a cargo from the cargo book, all the CP Terms Details will be from the cargo.
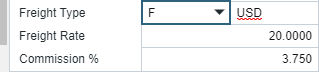
Step 8A. Enter Freight and Commission Rates
Enter the Freight Type, Freight Rate, and Commission % details.
Step 8B: Build the Estimate Itinerary
In the CP Terms Details, add a row for each port.

-
Click Add New Row.
-
Specify the port function (F).
-
Insert additional port details.
-
Dem: Demurrage Days. The rate is specified in the CP Terms Details screen for each cargo. Right-click each cargo line to access this screen.
-
OExp$: Dollar per ton liner expenses
-
L/D Rate (or port days)
-
Terms (Laytime terms)
-
Port Expenses
-
In the Estimate's Cargo grid, you can look up historical details on port expenses by right-clicking it and selecting Port Expense Search.
-
-
Extra Port Days
-
Laycan From/To
-
Any additional information as needed
-
Step 8C: Add Broker and/or Address Commission
In CP Terms Details, add any broker and/or address commission.

In the Broker column, enter the broker name or XADDCOM for address commission.
Step 8D: Update Estimate
Select Update Estimate after updating CP Terms Details.
Step 9: Add Any Additional Cargoes and Select the Shortest Itinerary
If there is more than one cargo to be added to the voyage estimate, repeat steps 6-8 to add multiple cargoes to the voyage.
Use the Shortest Itinerary menu option to rearrange the itinerary for the shortest route for all cargoes.


Step 10: Adjust the Estimate Itinerary
After completing the above steps, the Estimated Itinerary will be displayed in the Itinerary Grid in the estimate. On this screen, you can manually update the full itinerary for the Estimate. This could include multiple cargoes, load/discharge options, and other port functions.

You can manually plan the Itinerary on the Estimate Port/Date tab, where you have the options to:
-
Make any changes to the itinerary: Right-click to Delete or Insert a Port. To change the sequence, Move Up, Move Down, or Move To a certain position.
-
Change the speed setting on a voyage leg.
-
Select the correct port function (F).
-
Change the weather factor (WF%) on a voyage leg.
-
Insert additional Idle days.
-
Insert additional port days (PDays).
Note: If more than one cargo is loaded at the same port, these operations are shown multiple times on the Estimate Cargo, Draft/Restrictions, and Port/Date tabs but are only displayed once in the Port/Date Group tab.
Step 11: Open the Bunker Planning Form
After planning the voyage itinerary, the next step is to plan for bunkers. On the Estimate menu, click Bunker Planning.

Step 12: Create a Bunker Plan

-
For each available bunker type, ensure the initial quantity and price are correct.
-
Insert bunkering ports in the itinerary as necessary with port function F. Bunker liftings can also be registered against load (L), discharge (D), and Canal (I) ports.
Note: Remember to insert extra port days (XPD) in the itinerary for bunkering time (0.5 days normally). -
Plan for bunker liftings by entering the intended lifting quantity and estimated bunker price at the time of bunkering. Select the "Transfer Received When Fixing" tick box before scheduling the voyage if you want the liftings to flow through to the voyage.
-
Close the form when planning is completed. The P&L figures are updated accordingly.
Note: You can use the TDEFAULT estimate to always have the "Transfer Received When Fixing" checkbox selected by default.
Step 13: Review the P&L
On Estimate details, open the P&L panel to review it. For more information about the Estimate P&L, see IMOS - P&L - Estimate.
Step 14: Open the Voyage Other Revenues/Expenses Form
If there are other miscellaneous charges or revenues you can anticipate from the voyage (like survey cost, armed guards cost if you are passing through piracy zones, insurance cost, etc.), you can access Voyage Estimate Other Revenues/Expenses from the P&L panel; click the Misc. Revenue or Misc. Expenses link.

Step 15: Enter Other Revenues and Expenses

-
Select the expense or revenue Code, Type, Currency, and Amount in line with the type as a minimum.
-
More expenses may be inserted by adding new rows.
Step 16: Open the Carbon Calculator to estimate Fuel EU and EU ETS regulatory costs (if applicable)
For Voyage Estimates to/from the European Union, we recommend using the Carbon Calculator to estimate regulatory costs. Review the IMOS - Carbon Calculator documentation to learn more.
Step 17: Save the Estimate and Address Validation Warnings
Your voyage estimate is almost completed! Save your work and then carefully read any system-provided warnings. If necessary, click X and return to the Estimate to fix it. Otherwise, click OK to continue.
