Home > Voyage Reporting > Designing Forms
Requires the Voyage Reporting module.
With the Form Designer, you can design your own custom forms, so you can gather and share the data that is most meaningful for you and your vessels and present it as you prefer. The data is collected and distributed in the same way as the standard forms.
-
The Forms Data Dictionary includes all the elements you can use.
-
For elements that map to other fields in the Platform, the mapping appears.
-
You can also define custom elements.
-
-
You can:
-
Create a new form of Report Type Arrival, Departure, Noon, Voyage Instructions, or Other, defining each form's workflow and where it applies. For example:
-
Create a custom Noon Report for In Port or At Sea.
-
Create a template for sending Voyage Instructions.
-
Create a custom Statement of Facts.
-
-
Design a form:
-
Create a header to appear at the top of a form.
-
Add elements and controls: Select the elements and controls that are appropriate for your needs, create custom elements, and enter custom expressions.
-
Arrange elements on a form: Group elements into sections and define the form layout.
-
-
Creating a New Form
-
In the Forms section of the Forms and Vessels workspace, do either of the following:
-
To create a new form from scratch, click New Form.
-
To copy an existing custom or standard form, hover over its row, click Configure ▼, and then click Copy.
Note: To copy a standard form, make sure it is updated to version 2.21.619 or higher.

-
-
Configure the form:
-
Report Type and Form is applicable: Some Report Types are applicable only in certain places. Fields that are required for the validation of a Report Type are automatically added to forms of that type and cannot be removed.
Report Type
Form is applicable
Required Fields

In Port
In Port (Berth): For Onboard forms only.
In Port (Cargo): For Onboard forms only.Voyage Number
PortIn Port
In Port (Berth): For Onboard forms only.
In Port (Cargo): For Onboard forms only.Voyage Number
Port
In Port
In Port (Berth): For Onboard forms only.
In Port (Cargo): For Onboard forms only.
At Sea
In Port or At SeaVoyage Number
PortVoyage
FOB CargoNone
In Port
In Port (Berth): For Onboard forms only.
In Port (Cargo): For Onboard forms only.
At Sea
In Port or At SeaVoyage Number
-
Fields that are required based on another field that was added are also added automatically, but they can be removed.
-
When you add the field Slip %, Observed Distance and Engine Distance fields also appear because Slip % is calculated as 1 − (Observed Distance ÷ Engine Distance). However, if you remove Observed Distance and Engine Distance, Slip % cannot be calculated.
-
-
-
Layout:
-
Maintain Form Field Positions When Hidden: Select to have all fields maintain their position on the form whether or not they are hidden, preventing other fields from shifting.
-
-
Workflow:
-
Require Approval
-
Allow Submission Prior to Voyage Commencement
-
Display Chief Engineer's Name
-
For Voyage Instructions only:
-
Enable Revision History
-
Take P&L Snapshot Upon Submission (with configuration flag CFGEnableVIFormPnlSnapshots enabled)
-
-
-
-
Click Save. Your form appears in the Form Designer, with Form Elements (sections and elements) in use on the left and a live preview on the right.

-
In the Form Designer, do any of the following:
-
Edit form configuration: Click Settings.
-
-
Click Save. When the form is saved, the button changes to

-
To return to the list, click < Back to List. To open the form from the list, click its name.
-
Creating a Header
When you create a new form, in the Form Designer, a Header section appears at the top of the left panel. To create a custom form Header, add any elements available in the Forms Data Dictionary to the Header section.
-
In the Forms Data Dictionary, make sure all the elements you need are available. Create custom elements as required.
-
To create a company logo, create a new Image element.
-
To create contact details or a form title, create a new Paragraph element.
-
-
In the Form Designer, edit the Header section or add elements to it.
The Header section cannot be deleted. However, if you remove all elements from the Header section, the form title will appear as usual at the top of the form.
Adding a Section
-
Next to Form Elements, click

-
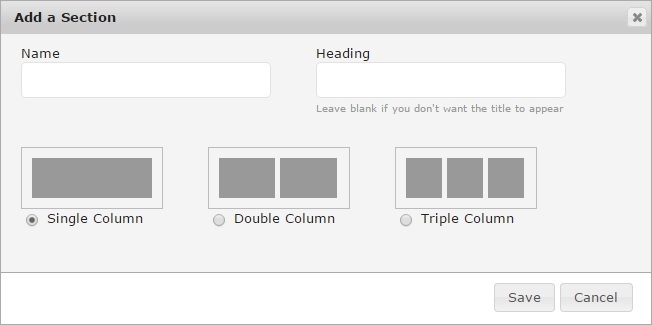
Complete the fields:
-
Name
-
Heading
-
Columns: single, double, or triple
-
-
Click Save.
To edit a section, under Form Elements, hover over it and then click 
To delete a section, under Form Elements, hover over it and then click 
Adding an Element or Control
-
Make sure the element is in the Forms Data Dictionary. You can add a custom element there.
-
Under Form Elements, hover over a section or element and then click

-
Type a letter into the field. A list appears with all available elements and controls that contain that letter.
-
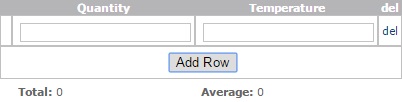
Controls are grids with a number of rows and columns of fields. Each control is followed by this icon in the list:

-
-
Select the element or control.
-
Edit the element:
-
Under Form Elements, hover over it and then click
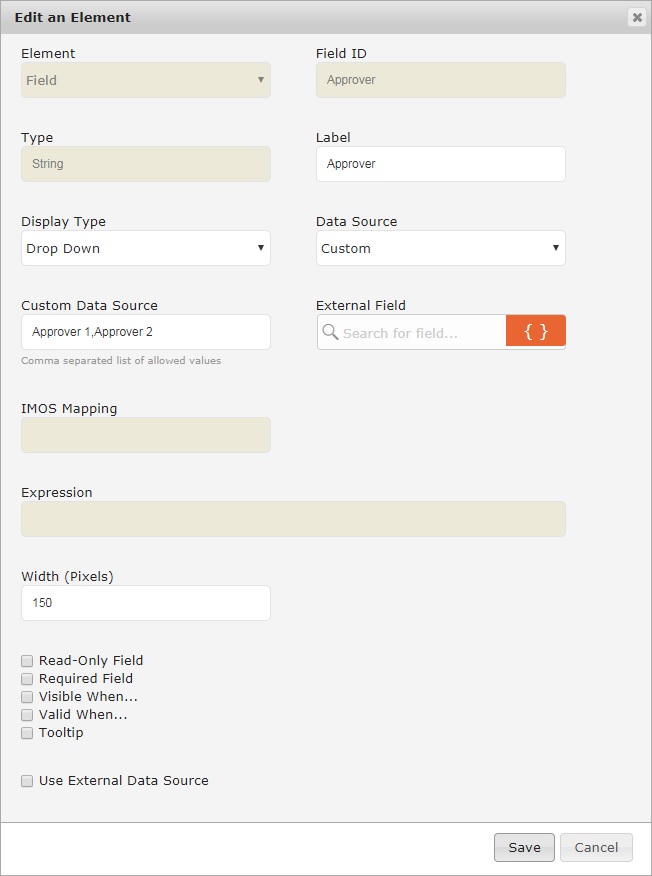
Examples: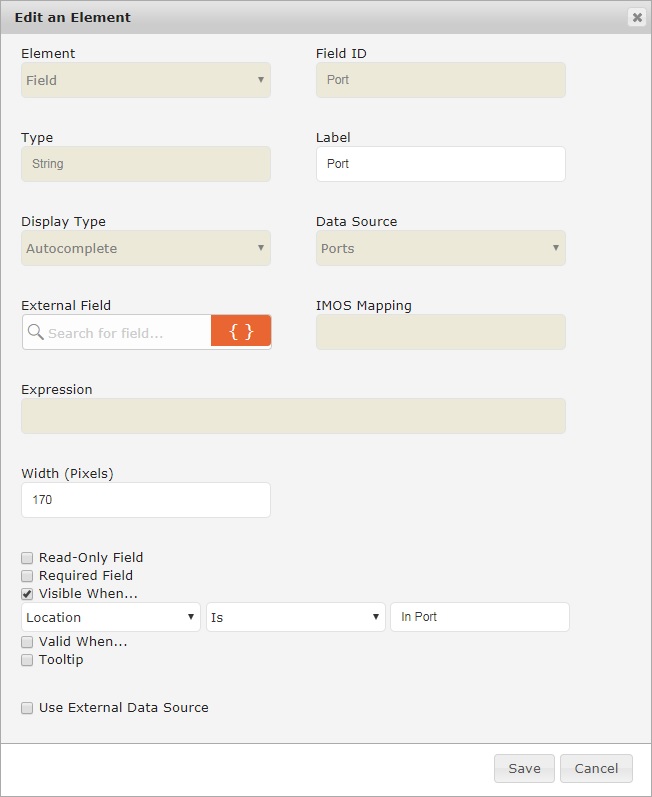
-
Change any of the following:
-
Label: Element label to appear on the form.
-
Display Type (for custom fields only)
-
Complex Type (for Complex Controls only)
-
Data Source (for String Display Types Autocomplete and Drop Down only): Select a data source, or select Custom to create a comma separated list of allowed values.
-
Expression (for Read-Only String, Decimal, Integer, and Date fields only): Enter a custom expression, which can include numbers, Field IDs, addition (+), subtraction (-), multiplication (*), division (/), and parentheses.
Note: When using dates in an expression, Type must be String. -
Text (for paragraphs only): To help you format text, the rich text editor appears.

-
External Field (for Voyage Instructions only): To embed other Forms Data Dictionary elements in a Boolean field Label or paragraph Text box, do either of the following:
-
In External Field, search for a field and then click

-
Type a Field ID inside curly brackets. For example, to embed Aft Draft, type {AFTDraft}.
When you send Voyage Instructions, the latest field values populate.
-
-
Width (Pixels) (for String, Integer, Decimal, and Time Span fields and paragraphs only)
-
Decimal Places (for Decimal fields only): Rounds to two decimal places, unless otherwise specified.
-
Read-Only Field
-
Required Field
-
Enable Number Formatting (for Integer and Decimal fields only): When this check box is selected and Use Browser's Locale Setting for Number Formatting is selected in Voyage Reporting System Configuration, number formatting respects browser locale settings.
-
Visible When: Specify that the field is visible when a condition based on the value of another field is true; for each field, select an operator and enter a value.
-
For a field within a Row Details section of a table, other fields in its row are available as operators.
-
-
Valid When: Specify that the field is valid when a condition based on the value of another field is true; for each field, select an operator and enter a value.
The form cannot be submitted with a validation error. A field with an error is marked with a red line, and a message describes the required value. -
Tooltip: Enter text to appear when the mouse pointer is held over the field name, overriding any value from the Forms Data Dictionary. On the form, a dotted line under the field name indicates that it has a tooltip.
-
Use Default GMT Offset (for Date Time fields only): Select to use the value of the GMT Offset field, which must be added to the form.
-
Use External Data Source (for Voyage Instructions only): To link this element to a Platform field or table, select the check box, search for a field or table name, and then select it.
-
Show Distinct Values Only (for fields in one-to-many joins only): Outputs a comma-separated list of distinct values.
-
-
Enable Row Details (for tables only): Show additional fields that relate to each table row. Under the table in the Form Elements column, drag and drop additional fields under the Row Details heading.
-
Static Table (for tables only): When selected, a drop-down menu appears of all fields in the table. To determine the number of rows that automatically appear, click a Field ID.
Example: In the drop-down menu, if you click Engine_Type and there are four possible values for that field, four tables rows automatically appear with the Engine Type column completed. -
Display association with another field (for fields in a table only): To highlight the current field and another field in the same table, select the check box and then search for a field name.
-
Column Calculation (for Integer and Decimal fields in a table only): Select Total or Average to add or average the values in the column.
-
-
Click Save.
-
To delete an element or control, under Form Elements, hover over it and then click
-
You cannot delete a required field.
-
For copies of standard forms, not all fields are available in the Forms Data Dictionary. To recover a deleted field, you must start over by making a new copy of the standard form.
Arranging Elements on a Form
The sequence of elements in the left panel determines their sequence on the form.
-
Sections and elements appear on the form in the same sequence as in the left panel.
-
Elements appear in sections based on the number of columns in the section:
-
Single Column: The list of elements in the left panel goes down the form.
You might want to use Single Column for controls. -
Double Column: Two elements go across, and the next elements wrap to the next line.
-
Triple Column: Three elements go across, and the next elements wrap to the next line.

-
Moving an Element
To move a section or an element to a different location on the form, drag it in the Form Elements panel to where you want it. You might find it easiest to collapse a section before moving it.
Expanding and Collapsing a Section
To collapse the list of elements in a section, click v to the left of its name.
To expand it again, click > to the left of its name.