IMOS - Transaction Data Entry
Home > Financials > Transaction Data Entry
🔑 This is a Key Topic, with high value for all users.
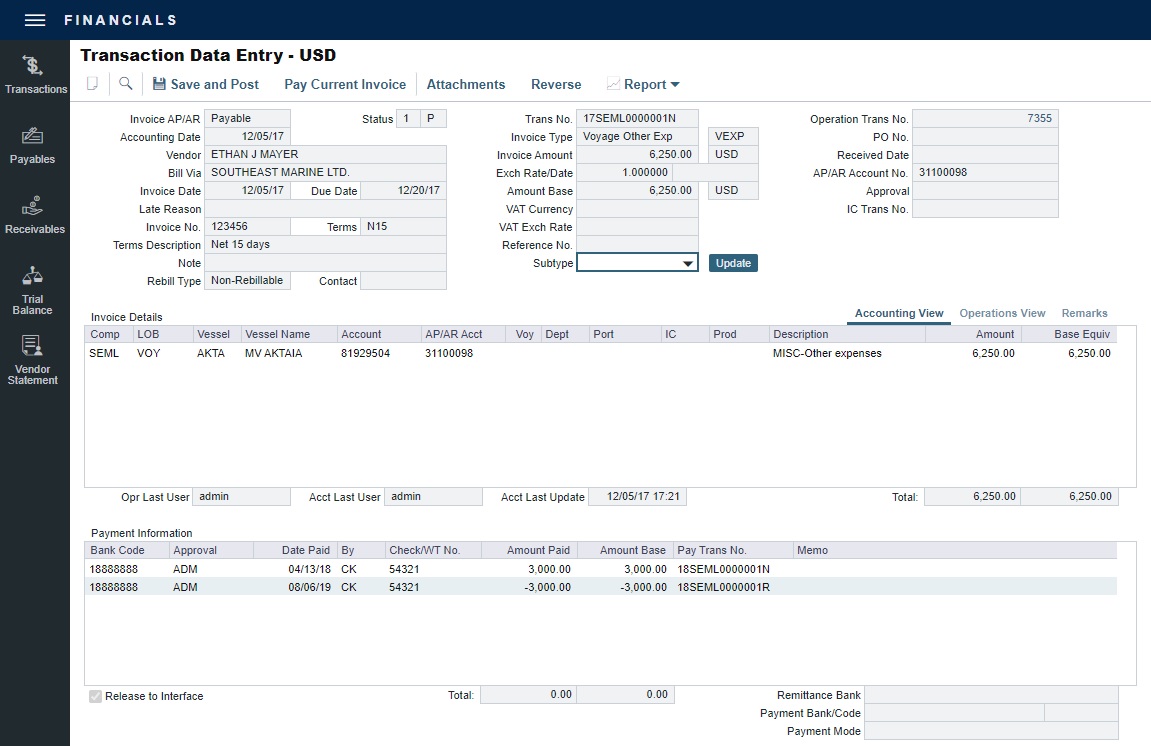
Accountants can create invoices without having to start in Operations by using the Transaction Data Entry (TDE) form. When posted, the invoice transaction data is back-created into any relevant voyages in Operations.
This article contains the following information:
Creating a Transaction
On the Financials menu …, under Transactions → click Transaction Data Entry.

Default values appear based on Invoice Default Rules and Invoice Detail Default Rules.
Select either Payable or Receivable.
Complete at least the Accounting Date, Vendor or Customer, Invoice Date, Due Date, Invoice No. (for a payable invoice), and Invoice Type.
To calculate the Due Date, complete the Terms field by specifying a Payment Terms code.
Exch Rate/Date:
When creating transactions from this form, the date defaults to the Accounting Date and is not affected by configuration flags.
When creating transactions in Operations, the date defaults to the Exchange Rate Date on the Operations invoice; if not available, the date defaults to the Invoice Date.
When the Exchange Rate is overwritten manually on the Transaction Data Entry form, the Exchange Rate Date becomes the same as the Accounting Date.
Entering a record in the Bill Via field changes only the header information of the invoice but has no effect on the remittance bank details.
Complete Invoice Details:
Accounting View tab: Enter Company, Line of Business, Vessel code or Vessel Name, and Amount.
Operations View tab: Enter the Bill (Detail) Code for the Source Code selected as the Invoice Type. Its Item Description appears. If there is a Business Rule for the Source Code/Bill Code, the Account field on the Accounting View tab will be filled in automatically, but it can be overwritten. Changes to the mapping can be made in the Business Rules.
Note: If the Account field on the Accounting View tab is not editable, it means that Edit Account on Transaction Data Entry Module Right (enabled by configuration flag CFGEnableEditTDEandJournalAccountsEntry) is not selected for your user or group.
Remarks tab: Enter Invoice Details and Additional Remarks. On posting, the text is captured in the output invoice XML.

On the toolbar, click Save and Post. Payments appear in the Payment Information grid at the bottom of the form.
For invoices created on the TDE form, attachments can be added after the form is saved. On the toolbar, click Attachments.
Status Codes
Several Status codes appear on the TDE form, depending on the stage of the transaction.
V = Saved Only. Transaction data is entered and saved but not posted. A pending transaction number is generated. No changes to invoice amount are allowed.
1 = Posted. The transaction is posted but not yet paid.
0 = Posted and Paid. The transaction is posted and saved.
R = Reversed. The transaction is reversed either from when it was paid or posted.
X = Canceled. This Status does not appear on the form, but it does show up in the XML files when the transaction is canceled; on the form, Status code R appears.
Creating a Rebillable Invoice
If a rebillable transaction does not have a rebillable invoice, hover over the empty Rebill Inv No. field and then click 🛈.
Payment Batches
Configuration flag CFGBatchPaymentSupported must be enabled.
If Payment Batches are enabled, an additional tab appears along with Payments information. The Payment Batches tab includes information about all payment batches related to the invoice; the corresponding batches can be opened from the context menu of each line.

Batch Status:
Sent: The batch has been sent.
Accepted: All payments in the batch were accepted.
Amended: At least one payment in the batch was rejected, amended, and resent, and no payments in it were rejected.
Rejected: If any payments in the batch are rejected, the batch is rejected as well.
A posted invoice can be assigned to a Payment Batch. Click the Payment Batch No. field label link to assign a Batch Number or view the Payment Batch.
Reversing a Transaction
If there is a payment against the invoice, cancel it before reversing the transaction.
On the TDE toolbar, click Reverse.
Enter reversal information and then click OK.
Provisional Invoices
When the configuration flag CFGActEnableSaveOnly is enabled, a Save button appears on the TDE form. Clicking it creates a new invoice status V (these types of transactions should be numbered using the VVVV company code). A Reject button deletes these provisional invoices and also resets the bill items.
Last Modified Time Stamps
Last modified user and time stamp data exists to assist with auditing the most recent edits to the record.
Opr Last User = The last user to update and save the transaction in the operational invoice view, for example, the Freight Invoice form in the Voyage Manager.
Acct Last User = The last user to update and save the transaction in the current accounting-oriented view, the Transaction Data Entry form.
Acct Last Update = Posted. The transaction is posted but not yet paid.
Alerts in the Transaction Data Entry Form
We recommend that IMOS admins configure alerts in collaboration with department heads
In the Data Center under Task & Alert Rule Set List, you can configure rules that generate alerts in the Transaction Data Entry form (and/or the Journal Entry form). With alerts, you can:
Guide your users through the correct workflow
Prevent mistakes
Define required fields
You can nudge users with acknowledgeable warnings and really get their attention on important items using errors. To set a specific rule to apply only to the Transaction Data Entry form and not also to the Journal Entry form, use the Trans Type field.
When an Alert is entered for a Vessel or Address Book, the field is highlighted in light red.
Panels
Additional information for the current workspace is available in panels on the right:
How to Default Remittance Bank to Mandatory
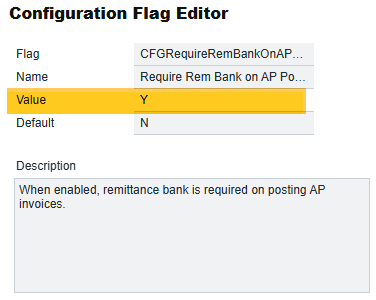
There is a configuration flag setting named "CFGRequireRemBankOnAPPosting“.
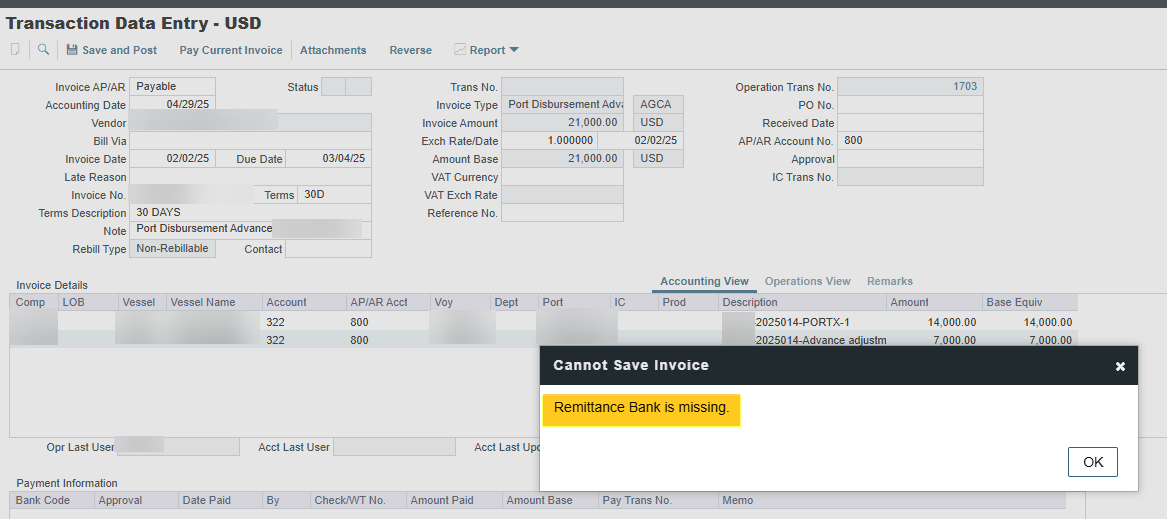
By enabling this flag, the remittance bank will be required at the time of posting an AP invoice.
If the remittance bank is not selected, there will be an error:

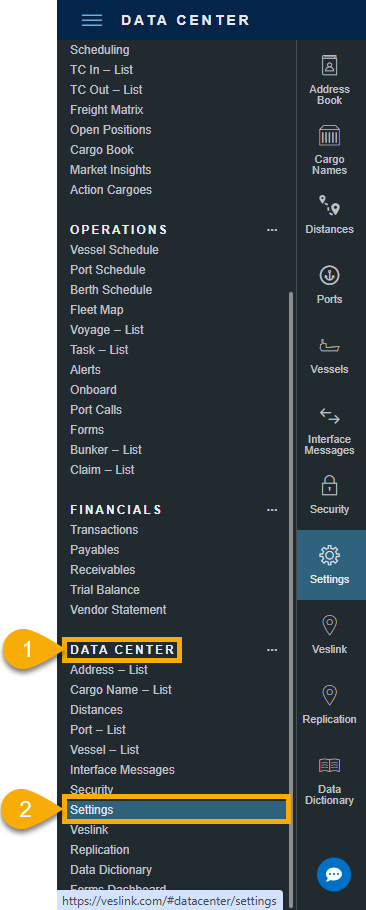
To enable this flag, go to Data Center → Settings:

After which, search for "CFGRequireRemBankOnAPPosting“ → Enable the flag → Save.


