Home > Operations > Voyage Manager
🔑 This is a Key Topic, with high value for all users.
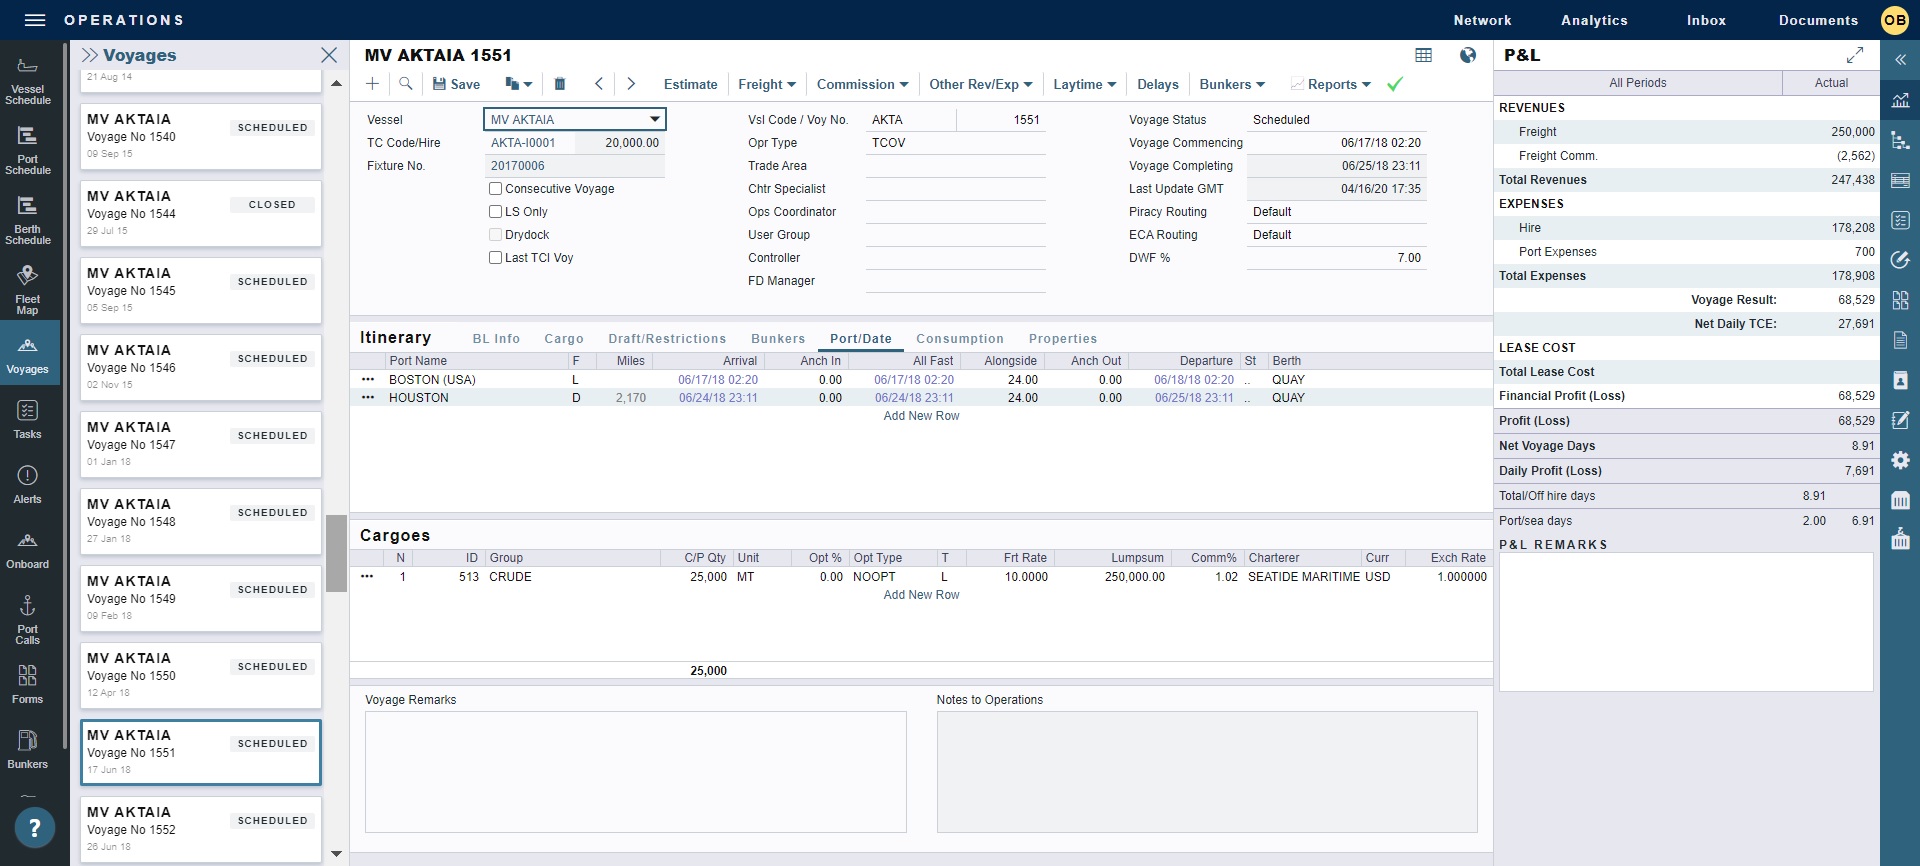
In the Voyage Manager, you can view all voyage information in context and in a centralized workspace. In addition to global panels, workspace panels display the voyage P&L, Summary (overview with links to relevant information), Invoices, Forms (voyage reports submitted by vessels), Voyage Instructions, Contacts, Notes, and Properties. You can also switch between a detailed and map view of the itinerary.
To view an existing voyage, do one of the following:
-
On the Voyage List, click its row or Voyage No. link.
-
On the Vessel Schedule or Port Schedule, click its bar.
A new voyage can either be created from scratch or contain the data entered by the Chartering user into an Estimate, Voyage Fixture, Cargo, VC In, Time Charter In, or Time Charter Out.
-
The Voyages card panel on the left is collapsed by default. To expand it, click >>; to close it, click X.
-
As with any other details view, you can navigate to a different record by clicking its card or return to the list by clicking its Name.
-
To share a voyage, copy its URL and then share it with any signed-in users in your organization.
-
Details about the voyage are in the center:
-
Voyage information appears in sections for general information, Itinerary, and Cargoes.
-
You can access additional tools, forms, and information on the toolbar and right panel.
-
To view the voyage on the map, click


-
When an Alert is entered for a Charterer, a Vessel, or a Port, the field is highlighted in light red.
-
Toolbar
-
Use tools on the toolbar to create, find, save, or delete records.

-
Navigate to the previous < or next > voyage.

-
Estimate: Open the Estimate.
-
Freight: Open Freight Invoice or Expenses Rebill Management.
-
Commission: View and create Freight/Relet Commission, TC In or Out Commission, or Claim Commission Payments.
-
Other Rev/Exp: Open Voyage Other Revenues and Expenses, Rebills for Off Hire and Port Expenses (when configuration flag CFGRebillForOffhire is enabled), Deviation Analysis, or Profit Share.
-
Laytime: Open Estimated Demurrage, New Laytime Calculation Setup, or Laytime Notes (to record notes related to the Laytime Calculation).
-
Delays: Open Delay.
-
Bunkers: Open Voyage Bunkers, open Bunker Liftings, or Add Fuel Types From Vessel that are not present in the voyage.
-
Reports: Run Voyage Reports or a Voyage XML Export.
Tow Voyages
With the Barging module, there are additional options on the toolbar for managing Tow voyages:
-
Overlap: Access the Tow and allocate overlap costs. This button appears when a tow is participating in overlapping voyages.
-
Equipment: Access the Activity Log to manage the equipment involved in the voyage.
Workspace Panels
To access additional information in workspace panels on the right, click buttons for any of the following:
Most of these panels can be expanded; in that case, the Voyage Manager is collapsed:

You can also access the Documents panel from the Voyages workspace.
Tutorial: Accessing Voyage Panels and Map View
IMOS - Tutorial - Accessing Voyage Panels and Map View
Note: This tutorial is a GIF, which plays on a loop and does not include any audio narration. To restart the tutorial, refresh this page. To expand the tutorial, click it.
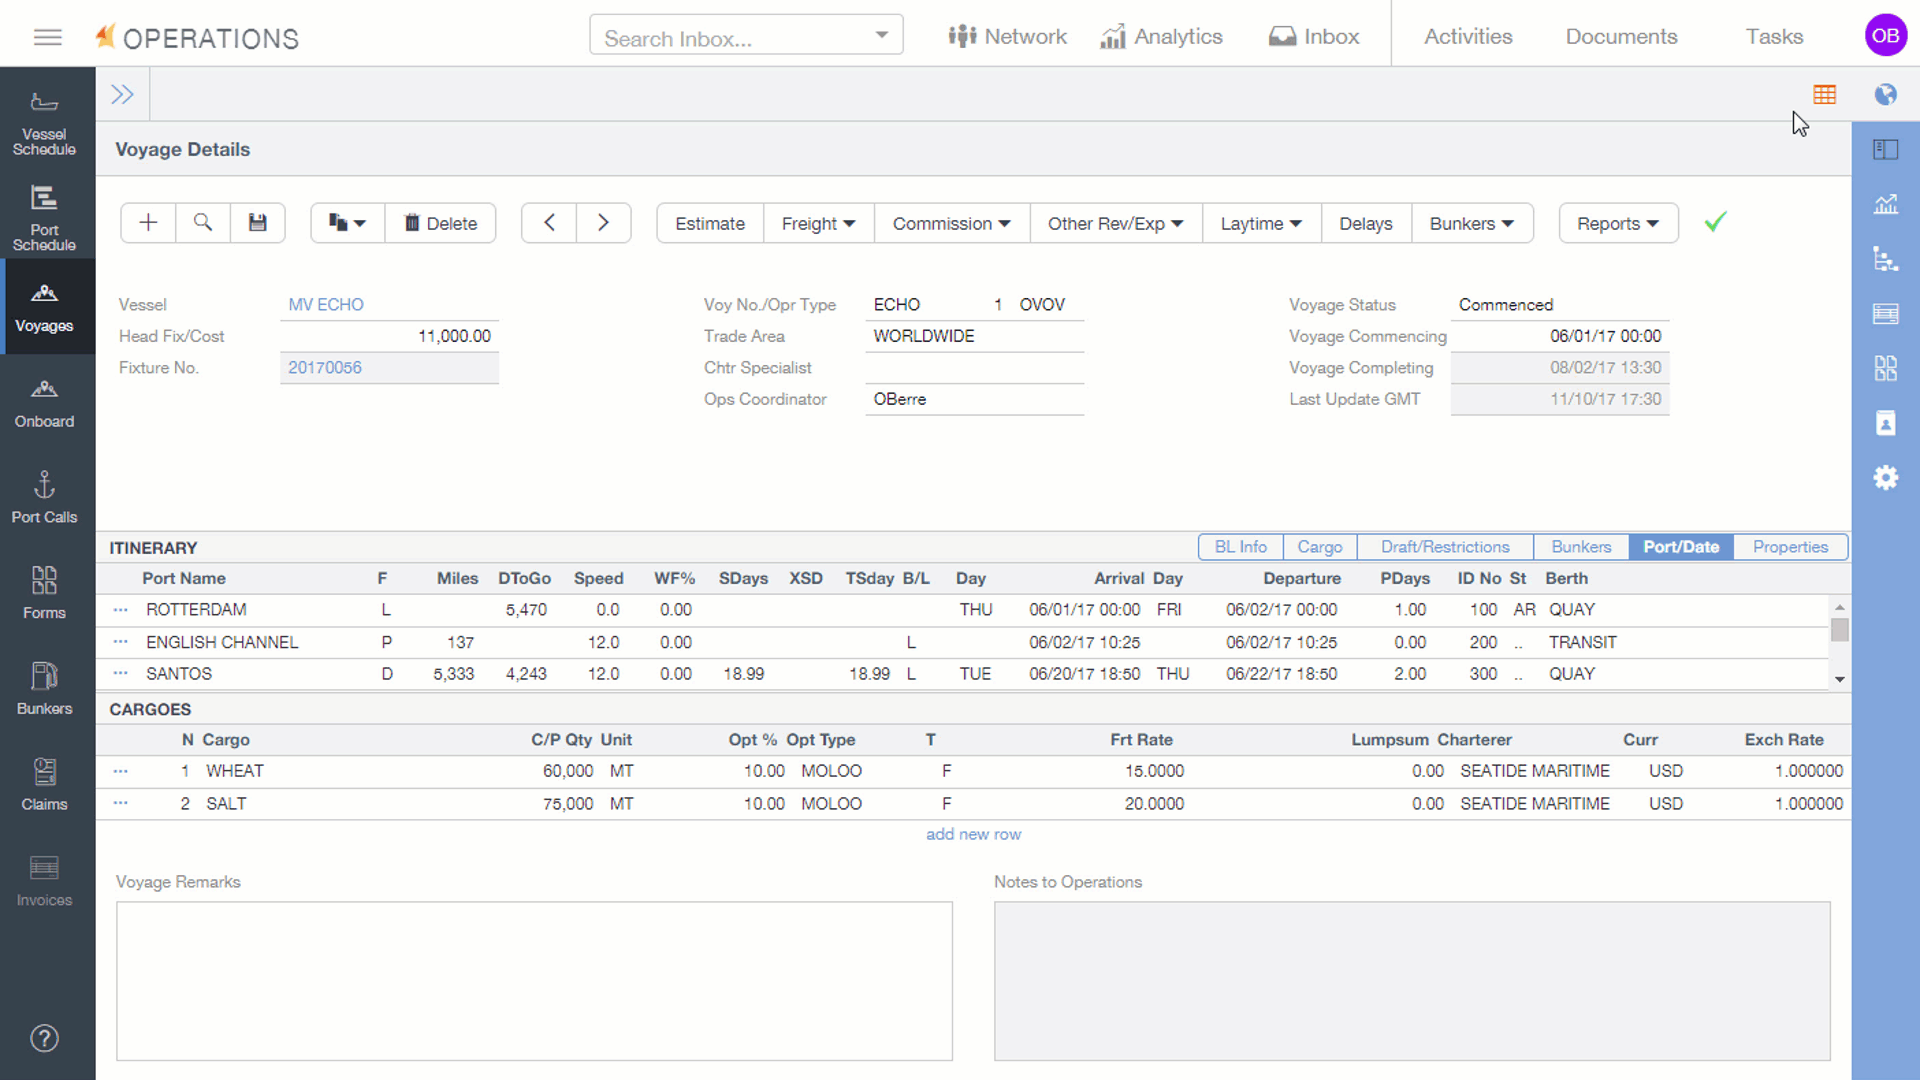
General Information
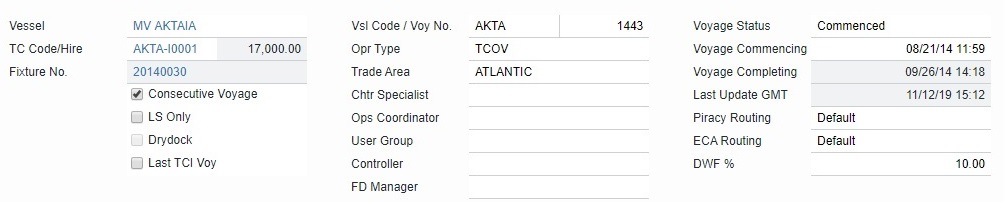
General information is at the top of the Voyage Manager; different fields can appear, depending on the Operation Type and your configuration.
-
The required fields, Vessel and Voyage Number, are pulled in from the Time Charter Out, Voyage Fixture, or Create New Voyage form. With configuration flag CFGAllowOpsVoyageRenumbering enabled and the Edit Voyage Number Module Right, you can specify a new Voyage Number.
-
Once a voyage is created, you cannot change the nominated Vessel. If you need a different vessel, a new voyage must be scheduled.
-
-
Consecutive Voyage: Select to synchronize the Voyage Completing date/time and end bunker lots of the previous voyage with the Voyage Commencing date/time and opening bunker lots of the current voyage.
-
LS Only: Select to use low-sulfur fuel only for all consumption. This will overwrite any Fuel Zone applied to the voyage.
-
Drydock: Select to indicate a drydock voyage. For more information, see Recording Drydock Voyages.
-
Last TCI/TCO Voy: Select to indicate if the voyage is the last TCI/TCO voyage.
-
User Group and User fields can be configured to display a different field label, using configuration flags CFGUserGroupPrompt and CFGUserPrompt.
-
Piracy/ECA Routing: Click any of the following to update additional information:
-
VESSEL NAME: Open Vessel details.
-
FIXTURE NO.: Open the Voyage Fixture.
-
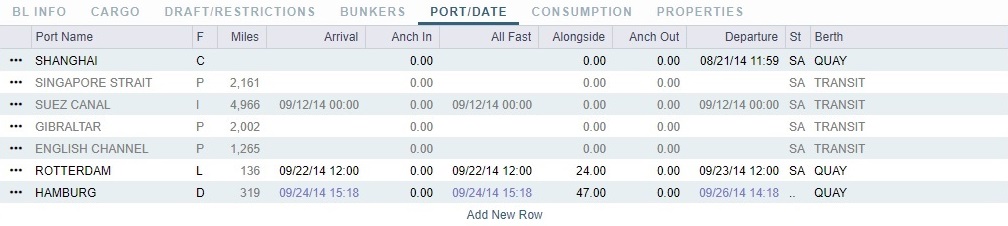
Itinerary Grid
In the Itinerary grid, enter each Port Name and Function.
-
Function: Some Port Functions drive default behavior at the port. For example, L and D require cargo handling; Y and Z require delivery and redelivery.
-
If bunkers have been received at a port, or if actual Port Expenses have been entered, that port cannot be changed to functions C, P, or T. These functions have no port time, so no bunkers can be received, and no port expenses can be incurred.
-
When Port itinerary is created, by default, row colors alternate between white and grey for clearer depiction. The color will change when certain port functions are assigned:
-
I - Canal Transit: Row color changes to light blue
-
M - multi-purpose: Row color changes to orange
-
Manually assigning P function to a specific port or point: Row color changes to light blue
-
-
-
-
Miles defaults based on IMOS Distances table and is calculated in the following way:
-
When the preceding sea leg is completed and the observed distances are reported in the Activity Reports, the value is the sum of the reported observed distances. It is shown in black to indicate it as the actual distance.
-
If the preceding sea leg is not yet completed, or if any observed distance was not reported in the preceding sea leg, the value will remain as the estimated value. It is shown in grey to indicate it as an estimated distance.
-
Editing Miles adjusts bunker consumption and port arrival and departure.
-
-
Speed defaults basis the Vessel form. Editing this field adjusts bunker consumption and port arrival and departure.
-
WF% (Weather Factor) and XS (Extra Sea Days, with a day value), and P Days (Port Days) can also be adjusted to manipulate the Itinerary.
-
St (Status) for each port changes, based on Port Activities:
-
.. = Not arrived
-
AR = Arrived
-
SA = Sailed
-
TE = Terminated; sailed from the last port in the voyage
-
-
A Transit port (Port Function P or I) can be locked to prevent it from being changed or removed: Right-click the port and then click Lock Transit Port. A locked Transit port has a light blue background in the Itinerary.
Note: A Transit port cannot locked by default. To remind users to lock a Transit port, you can create an acknowledgeable Alert at the Voyage level.
-
Actual arrival and departure times are black; estimated times are blue.
-
Upcoming ports with insufficient bunkers are red.
-
If the bunkers ROB falls under the safety margin (specified per fuel type for the Vessel), the text in the port line turns red, and the Voyage Validation icon turns red

-
To choose a perspective, click a tab:
-
CP Terms (with configuration flag CFGExpandVoyageManagerRowsets enabled)
-
Consumption (with configuration flag CFGVoyageFormat set to 1)
-
Properties (when User-Defined Fields applicable to the voyage are set up)
-
By default, the Miles (nm) value is back-calculated by the system. However, it can be manually changed before Activity Reports are submitted.
The Miles column on the Cargo tab always shows the estimated distance by design — it does not update when the operator enters the actual distance. The updated miles will be reflected in the Miles column of the Port/Date tab instead.
Itinerary Line Item Menu
Depending on the Itinerary perspective and Port Function, you can access the following forms from a port line item. Right-click and then click:
-
Activity Log - Barging: To manage equipment (or Activity Log without the Barging module).
-
Lightering Information: To edit the Lightering Job form (requires the Lightering module).
To enter Fixture and/or Operations Itinerary remarks, click Fixture Itinerary Remarks or Operations Itinerary Remarks, enter the remarks, and then click OK.
You can also take the following actions on Itinerary line items using the line item menu:
-
Insert Port
-
Delete Port
-
Lock Transit Port (Port Function P or I): Prevent the port from being changed or removed.
-
Routing: Select a route from different options.
-
Move Up
-
Move Down
-
If the port has associated Pilot Stations (configuration flag CFGEnablePortPilotStations must be enabled):
-
Insert Pilot Before
-
Insert Pilot After
-
Switch to Pilot
-
CP Terms Tab
Note: Configuration flag CFGExpandVoyageManagerRowsets must be enabled.
This tab enables you to view twice as many port call lines without having to scroll.

BL Info Tab
The BL Info tab is a view of Cargo Handling, with Bill of Lading information and actual Ship quantities.

You do not have to open the Cargo Handling form; you can update this information here.
Notes:
-
When operating a RELT voyage, only cargo handling lines for Sale (Cargo) contracts are permitted to be entered on the BL Info tab. If cargo handling lines for linked Purchase (VC In) contracts are present, contact Veson Nautical Support via the Help Center for troubleshooting assistance.
-
The decimal places set for BL/Disch. Qty are hard-coded and cannot be changed.
Cargo and Draft/Restrictions Tabs
The Cargo and Draft/Restrictions tabs are the same as on the Voyage Fixture. If something changes, you do not have to go back to the Voyage Fixture; you can make any adjustments here.


Bunkers Tab
The Bunkers tab displays the Arrival and Departure date and time for each port, with the amounts for each bunker type on arrival, received, and on departure.
On the Voyage Manager Itinerary, you can update arrival/departure ROBs on the Bunkers tab for upcoming ports to effectively plan and manage your voyages. Once edited, values appear blue to indicate a manual override. Actualized ROBs and commencing ports are not editable.

Port/Date Tab
The Port/Date tab is the default tab.
If two loading ports with the same cargo name are entered on the Cargo or CP Terms tab, they will appear as one loading port on the Port/Date tab.
-
For LNG Carriers, this tab includes an additional Fuel Cons Mode column. The Fuel Consumption Mode can be specified separately for each voyage leg. These defaults can be overridden on any leg:
-
Automatic
-
Dual Fuel
-
IFO Only
-
LNG Only
-
-
Arrival: If you cannot edit the ETA for a port in the Arrival column, follow these steps:
-
Open the Activity Report for the port that the vessel most recently arrived at or sailed from.
-
In the DstToGo column, if the value is 0, enter the DToGo (Distance to Go) value from the voyage for that leg.
-
Save and exit the Activity Reports form.
-
Save the voyage. The ETA at the next port should be editable.
-
-
At the bottom of the grid, Avg Speed = Total Miles / Total Sea Days / 24 Hours per Day
The ID No, or port sequence number, cannot be altered in an existing line item of the itinerary (e.g., you cannot change a port's ID No from 300 to 123 or 301). However, you can delete and re-add the port into the itinerary; this will change the ID No to the next available value, in increments of 100.
Consumption Tab
Setting the value of configuration flag CFGVoyageFormat to 1 enables the Consumption tab and adds Anchor In, All Fast, Alongside, and Anchor Out columns to the Port/Date tab.

-
B/L: Indicates if the vessel is Ballast or Laden during a port call. If Auto is selected, then the system determines ballast or laden status based on any cargo quantities entered on the itinerary.

-
CO2 (MT): Calculates CO2 emitted. If a fuel's CO2 Factor is ≤ 1.0000 or empty, the CO2 (MT) column will not calculate and will appear light red.
-
CO2 emissions are calculated by multiplying bunkers consumed by their associated CO2 Factors for the designated voyage leg. If multiple grades of bunkers are consumed, your CO2 emissions will show the joint value of all CO2 emissions for the associated voyage leg.
-
-
ECA Miles: Shows the ECA distances between port calls.
-
Instr Type: Instruction type; appears if Vessel Type Fuel Warranty Table is other than None.
-
At the bottom of the grid, Avg Speed = Total Miles / Total Sea Days / 24 Hours per Day
-
The XSD value is calculated using the SDays value times the weather factor WF%.
Properties Tab
On the Properties tab, when User-Defined Fields are set up in the Data Center, they can be selected here, and values entered for them.

Cargoes Grid
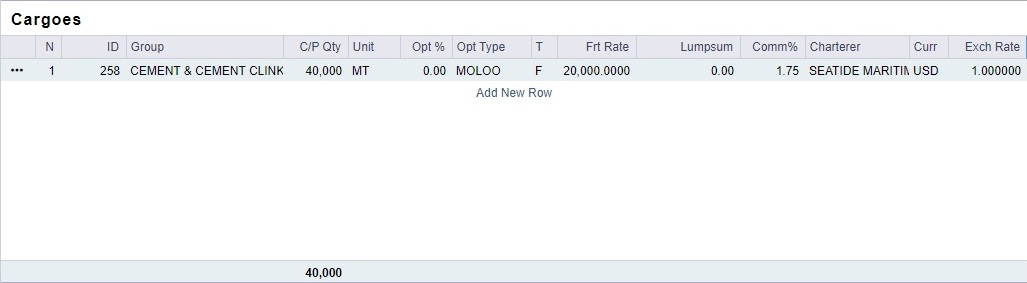
The Cargoes grid displays any cargoes from the Voyage Fixture. You can add a row to add cargo; if you have multiple cargoes for one port or one cargo loading or discharging at multiple ports or berths, enter each on a separate row.
-
For Opt % and Opt Type, see Cargo Tolerance Option Types.
-
For T (Freight Type) = W (World Scale), see World Scale Rates.
Many options are available from the Cargoes line item menu. On a line item, right-click and then click any of the following:
-
CP Terms Details: Open CP Terms Details, which describes the charter party terms for the cargo. To view the Cargo form, on the CP Terms Details form, click View.
-
CP Quantity Details: Open the CP Quantity Details, with quantity and billing details.
-
Options to adjust the Cargo:
-
Import Cargo: Set search criteria and select one or more Cargoes.
-
View Cargo: Open the Cargo form.
-
Swap Cargo: Search for a different cargo and either change the itinerary or select the check box to keep the current load and discharge information. For a non-relet voyage, the swapped out cargo is marked as unfixed.
-
Swap Sale Cargo: For RELT voyages, when VC Ins are enabled, search for a different cargo and either change the itinerary or select the check box to keep the current load and discharge information. After a new Sale Cargo is selected, the voyage is repriced, and the operational data is bound to the new Cargo.
-
Insert New
-
Duplicate Cargo
-
Remove Cargo
-
-
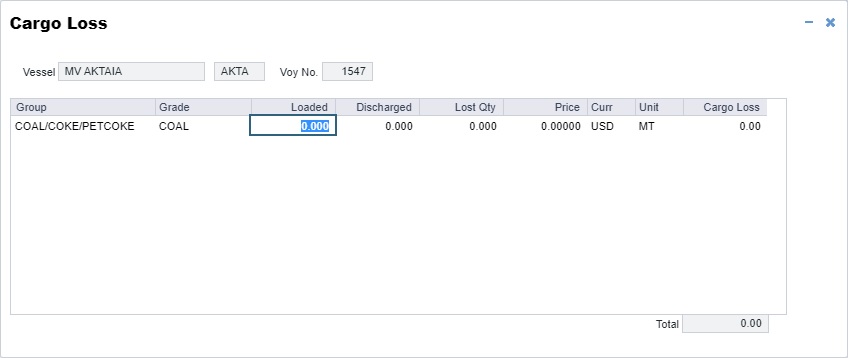
Cargo Loss: Open the Cargo Loss form to enter information about cargo losses.
Barging
The following differences are related to Tow voyages and the Barging module:
-
In the Cargoes grid, the Frt Rate column is highlighted in light pink for cargoes of Freight Type E.
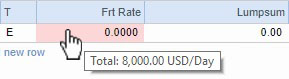
A tooltip displays the contract rate/day for the cargo, based on the equipment participation in the voyage as of:-
Current system date
-
Voyage Completing date for voyages in the past
-
Voyage Commencing date for voyages in the future
-
Managing a Voyage
Refer to this Knowledge Base article:IMOS - Managing a Voyage
Related Configuration Flags
|
Name/Flag |
Description |
|---|---|
|
Set a default view for the Voyage Manager side panel
|
When enabled, the Voyage Manager panel loads a selected view by default when you enter a value between one and eleven that corresponds to the following views: 1 - P&L, 2 - Sustainability, 3 - Summary, 4 - Invoices, 5 - Notifications, 6 - Revisions, 7 - Forms, 8 - Instructions, 9 - Contacts, 10 - Notes, 11 - Properties. If you set the value to 0, no side panel will be visible on page load. The default configuration flag value is 1, which maintains the existing view. |
|
Nomination Date On Fixture And Voyage
|
When enabled, a new Nomination Date value is added to the Voyage Fixture and the Voyage Manager objects. When the vessel is nominated to a cargo, the nomination date must be populated manually. This date can be separate from the Fixture Date, the Voyage Commencement Date, or CP Date on the cargo. When the nomination date is populated on the Fixture, it will carry down to the Voyage Manager on scheduling. If the nomination is updated on the Voyage it will update the Fixture. |
|
Allow Operations Voyage Renumbering
|
When enabled, users can specify a new Voyage Number for a voyage by modifying the corresponding field in the Voyage Manager or the Voyage Fixture, or by rescheduling the voyage via the Voyage Manager Copy toolbar button. In addition, the Edit Voyage Number Module Right appears, allowing this ability to be granted to certain users but not others. |
|
Auto Complete Voyage
|
Sets the Voyage Status to Completed if a Departure report has been entered for the last port call of the voyage. This applies only to voyages that do not end in a Terminating (T) port. |
|
Cargo Handling Trade No Title
|
Provides an override for the column title of the Trade No. column, which is enabled with CFGEnableCargoHandlingTradeNo. Leaving the setting blank causes the column title to remain Trade No. |
|
Default Forecast Voyage Status
|
When this and Enable Forecast Voyage configuration flags are enabled, initial Voyage Status is Forecast by default instead of Scheduled. |
|
Default Lob on Cargo Import
|
When importing a cargo, specifies whether or not the LOB specified on the imported cargo should be used to default the LOB on an Estimate, Voyage Fixture, and Voyage if an LOB has not yet been specified. |
|
Default Trade Area on Cargo Import
|
Enables defaulting the Trade Area on a voyage to the one from the imported Cargo. |
|
Default Voyage DA Desk Enabled
|
For every newly scheduled voyage, selects the DA-Desk check box (enabled by CFGShowDADeskCheckBox) by default. |
|
Default Weather Factor
|
Specifies the default value in the DWF % field. |
|
Enable BL Info Comm ID
|
When enabled, the Voyage Manager BL Info tab shows the Commercial ID of each cargo parcel. |
|
Enable BL Info Reference No
|
When enabled, the Voyage Manager BL Info tab shows the reference number of the cargo associated with each parcel. |
|
Enable Cargo Handling Trade No
|
Note: CFGEnableMultiGrade must also be enabled. Y = If multigrade cargoes are enabled, adds a Trade No. column to the Estimate Itinerary Cargo tab, Voyage Fixture, Voyage Manager, Cargo Itinerary/Options tab, and (when config flag CFGEnableActInvDetProrationByItin is enabled) Cargo Itinerary Allocation form. Additionally, if cargo transfers are enabled, the column is added to the Transfers tab. This is a free-text field, where users can enter identifiers for a trade associated with the given cargo lifting. R = All the functionality of the Y setting is enabled, except that the Trade No. column is read-only. |
|
Enable COA Seq in Operations Overview
|
When enabled, in the Ops Overview tab of the Voyage Manager (enabled with CFGEnableVoyManagerOpsOverview), the cargo grid includes a CS column that shows the lifting sequence number for COA cargoes. |
|
Enable Forecast Voyage
|
Enables changing the Voyage Status to Forecast. Forecast voyages appear in Matching, Scheduling, and the Vessel Schedule. |
|
Enable IMOS Form Layout
|
When enabled, the Voyage Manager, Address Book, Port, and Vessel forms will have the same fields and layout as in IMOS desktop. |
|
Enable Itinerary Laycan Fields
|
Adds Laycan From and Laycan To columns to this form.
|
|
Enable Manual Vessel Name Complete
|
When enabled, on the Voyage Manager and New Laytime Calculation Setup forms, the Vessel field will only autocomplete when the user presses Enter. |
|
Enable OPA
|
Sets the OPA in the Voyage Fixture and in the Voyage Manager. Adds a Persistent check box to the Cargo Name form. |
|
Enable Standards
|
Hides the Port Expense field on some forms, enables standards for expenses, and adds a Port Expenses Details form and a Port Expenses Details button on the Port Expenses Summary to open it. When detail-level port expenses are being used, the PortExp column in the Voyage Itinerary behaves the same as the PortExp column in the Estimate itinerary:
An ECA Factor field also appears on COA, Cargo/VC In, and CP Terms Details forms. When ECAFactor is used in an ECA Recovery Charge Results/Fee expression and an ECA Factor value is entered on a contract, an ECA Recovery Charge Extra Freight Term is generated on that contract.
|
|
Enable USCG Inspection
|
When enabled, a USCG Inspection option is added to the right-click menu for US Ports on the Voyage Manager Port/Date tab and on the port menu that appears when clicking the Port link on the Ops Overview tab. On the USCG Inspection form, users can specify whether the USCG inspection has occurred and, if yes, the date of the inspection. This inspection date flows to the Laytime Calculator and appears above the Port Activities grid. If there are US ports in the voyage itinerary, the user is blocked from setting the voyage status to completed until at least one of the ports has the USCG Inspection field set to Yes. |
|
Enable Voyage Manager Operations Overview
|
Adds an Ops Overview view to Voyages; to access it, on the details or map view of a voyage, click
|
|
Enable Voyage Type Checkboxes
|
Adds Pool, Ice, Clean, and Coated check boxes to the Estimate and Voyage Fixture for reporting for bulk vessels. They are carried to the Voyage Manager, and their statuses flow between the forms. |
|
Expand Voyage Manager Rowsets
|
Add a CP Terms tab in the Itinerary grid rather than having a Cargoes Grid. This allows you to view twice as many port call lines without having to scroll. |
|
Group by Func on Cargo Import
|
When importing a Cargo contract, new ports for cargo loads will be added to the itinerary immediately after the last existing load port. Likewise, new ports for discharging will be added after the last existing discharge port. This behavior will not apply if M ports are present in the itinerary. |
|
Group Cargo Handling by Func
|
Groups cargoes by port function. This will cause an L and D to be grouped as an L when scheduled; otherwise, you will get two lines at the same port in the Voyage Manager. |
|
Hide Voyage Itinerary Columns
|
Hides corresponding columns on the Voyage Manager Itinerary grid, based on a comma-separated list of values. For example, to hide the Berth and XSD columns, set this config flag to Berth,XSD. Valid values:
|
|
Rebill for Offhire
|
Enabled, the user will see a new menu item under the Other Revenue/Expenses toolbar in Voyage Management called Rebills for off hire and port expenses. This allows the user to rebill these items when not under a TC. While displaying Port Expenses Rebillables on the Rebills for Off Hire and Port Expenses form, only one row was being displayed, which was the sum of all rebillable items from the Port Advance/DA form. This has been modified, and different rebillable items are displayed in separate rows on the Rebills for Off Hire and Port Expenses form. |
|
Show Cargo Rob in Voyage Manager
|
Adds a Cargo ROB column to the Port/Date tab in the Voyage Manager, or to the Consumption tab if CFGVoyageFormat is set to 1. This reflects the cargo remaining on board upon completion of cargo activities at the port. This feature will only function properly if all cargo movements use MT as their unit of measure.
|
|
Show DA Desk Checkbox
|
Adds a DA-Desk check box to indicate DA-Desk voyages. You can generate port calls to the DA Service Provider based on this setting if you decide not to use the portschinfo.exe configuration by company code. |
|
Show Hours in Voyage Manager Itinerary
|
Displays the following Itinerary columns in hours instead of days: SDays > SHours, SD > SH, XSD > XSH, PDays > PHours, PD > PH, XPD > XPH, LS SDay > LS SHour, and LS PDay > LS PHour |
|
Show Include in Cover
|
Adds the Include In Cover check box, to be used by the Pooling Information dataset.
|
|
Sort Voyage Autocomplete by Date
|
Causes the Vessel field selection list to sort voyages for a vessel by commence date in descending order. |
|
Use Voyage Estimate Voyage Deviation
|
Adds a Deviation button to the Voyage Manager toolbar to launch a Deviation Estimate. |
|
Voyage Estimate Show Cranes in Itinerary Grid
|
When enabled, the Cargo tab in an Estimate/Voyage Fixture/Voyage Manager will have a new column C, to indicate the use of Cranes in the specific port. This column will only be visible for bulk vessels, and its value can be editable from the Cargo tab in the Itinerary, the CP Terms Details form, or the Itinerary Details form of that port. |
|
Voyage Format
|
Value:
|
|
Voyapi Validate Cargo Laycan for Port
|
Adds validation warnings if, at the first port where a cargo is to be loaded, the vessel will arrive before the start or after the end of the cargo's laycan.
|
|
Warn on Mismatched Consecutive Voyages
|
A warning message appears when saving, if a modified Terminating Date no longer matches the Commence Date on the following consecutive voyage. |
|
Enable Lat Lon Override
|
Allows manual overrides for At-Sea Port Latitude and Longitude values in the Voyage Estimate and Voyage Manager, to more accurately reflect waiting points or itinerary deviations. |
|
Enable Producer TS Workflow
|
When enabled, adds new fields to the Voyage Itinerary and the Booking form to capture Transshipment Vessels being utilized by the entity carrying a cargo without capturing the Transshipment Voyages in full. This serves as a lighter-weight Transshipment-tracking mechanism than the features enabled by CFGEnableTransshipment. |
|
Voyage No Alphanumeric
|
When enabled, the voyage's external Reference number is used as the voyage identifier (instead of the Voy No.). For example, when emailing Voyage Instructions, the subject heading will be: "MV AKTAIA - Voyage EXTREFVOY24" instead of "MV AKTAIA - Voyage 24." |
|
Counterparty Label
|
If this flag has a value, references to Charterer in the Estimate, Voyage Fixture, and Voyage Manager are now replaced with the value of this flag, for example, Buyer. |
|
Enable Port Pilot Stations
|
Enables functionality around port pilot stations both in Master Data and through the Estimate and voyage itineraries. |
|
Enable Voyage Manager Cargo List
|
Adds Cargo and Cargo Handling tabs to the Voyage Manager. The Cargo tab is similar to the Cargo List, but only includes cargoes associated with the voyage. The Cargo Handling tab is similar to the Cargo Handling form; it includes a list of all cargoes associated with the voyage, with a line for each load and discharge. Lines highlighted in yellow indicate transshipment cargoes, while lines highlighted in blue indicate interservice cargoes. If a Cargo or VC In has at least one unacknowledged revision, its row is highlighted in the Cargo List. |
|
Store Firming ETA on Cargo Trigger
|
When a voyage’s status is set to the configuration flag value (forecast, scheduled, or commenced), a static Firming ETA field populates on the linked Cargo or VC In Itinerary/Options tab. You can compare this value with the actual ETA in a custom Report Designer report. To disable this flag, leave the value blank. |
|
Allow Restrict Voyage Auto Number Consecutive
|
Note: CFGUseGlobalVoyageNumbering must be set to N. If enabled, a new Voyage Auto-Numbering/Consecutive Checkboxes Module Right appears, allowing the administrator to restrict users' rights to modify the Automatically Number Voyage check box on the Create New Voyage Form, along with the Consecutive Voyage check boxes on the Create New Voyage Form and Voyage Manager. |
|
Use Global Voyage Numbering
|
If enabled, supports the option to use unique voyage numbers across the entire database, rather than simply for a particular vessel. When enabled, new voyages will be assigned the next highest sequential open number based on the other voyages in the database. |
|
Voyage Show Cancel
|
In the Voyage Manager, allows a Canceled status for Voyages. |
|
Display ECA Miles In Itinerary
|
When enabled, an ECA Miles column appears on the Port/Date tab of the Estimate and Voyage Manager Itineraries. |
|
User Group Prompt
|
When nonblank, changes the User Group field label on the Voyage Manager. |
|
User Prompt
|
When nonblank, changes the User field label on the Voyage Manager. |
